Neurological examination of the upper limbs
Peer reviewed by Dr Philippa Vincent, MRCGPLast updated by Dr Toni Hazell, FRCGPLast updated 20 May 2026
Meets Patient’s editorial guidelines
- DownloadDownload
- Share
- Language
- Discussion
- Audio Version
- Add to preferred sources on Google
Medical Professionals
Professional Reference articles are designed for health professionals to use. They are written by UK doctors and based on research evidence, UK and European Guidelines. You may find one of our health articles more useful.
There is more than one way of performing a neurological examination and a clinician should develop their own technique. Poor technique will fail to elicit signs or will produce false results.
See also the separate Neurological history and examination article which covers the basic principles of examination and technique.
Examination of the upper limbs may be performed more easily with the patient sitting in a chair or standing.
Inspection of the upper limbs1
Note if there appears to be any damage to the hands.
On inspection, note the following:
The resting posture. Note whether there is unusual rotation or clawing of the hand and whether anything about the patient is asymmetrical.
Look for muscle wasting or hypertrophy. Note whether it is focal or diffuse.
Look for involuntary movements such as tremor, tics, myoclonic jerks, chorea or athetosis.
Look for muscle fasciculation (sign of lower motor neurone disease process). These are subcutaneous twitches over a muscle belly at rest. Tapping the belly may stimulate fasciculation.
Upper limb examination of the sensory system
Examination of each of the sensory modalities:1
Light touch
Use the light touch of a finger, a piece of cotton wool or a piece of tissue paper.
It is important to touch and not to stroke, as a moving sensation, such as rubbing and scratching, is conducted along pain pathways.
Ask the patient to close their eyes and tell you when they feel you touching them.
Compare each limb in the same position.
Keep the timing of each touch irregular to avoid anticipation by the patient.
A logical progression is required. You may want to start testing over the shoulder and to move along the lateral aspect of the arm and up the medial side, as this moves progressively from C4 to T3 dermatomes.
Note any areas of hypoaesthesia or dysaesthesia.
Sharp touch (pinprick)
Test using a dedicated disposable pin. A disposable hypodermic needle is too sharp.
Use the sternal area to establish a baseline for sharpness before you begin.
Follow the same progression as with light touch with the patient's eyes closed, comparing both upper limbs.
Ask the patient to report hypoaesthesia (feels blunter) or hyperaesthesia (feels sharper).
Temperature
This is often overlooked but it can be important.
An easy and practical approach is to touch the patient with a tuning fork as the metal feels cold.
Compare the quality of temperature sensation on arms, face, trunk, hands, legs and feet.
Containers of warm and cool water may be used for more accurate assessment. Ask the patient to distinguish between warm and cool on different areas of the skin with their eyes closed.
Joint position sense (proprioception)
Test at the distal interphalangeal joint of the index finger.
Hold the middle phalanx with one thumb and finger and hold the medial and lateral sides of the distal phalanx with the other. Move the distal phalanx up and down, showing the patient the movement first.
Ask the patient to close their eyes and move the distal phalanx up and down randomly. Ask the patient to tell you the direction of movement each time.
Test on both hands.
If there is an abnormality, move backwards to the proximal interphalangeal joint and so on until joint position sense is normal.
Vibration sense
Use a 128 Hz tuning fork and ensure the tuning fork is vibrating.
Place it on the sternum to start with so that the patient can feel the sensation.
Then place it on one of the distal interphalangeal joints of one of the fingers.
If no vibration is sensed, move backwards to the metacarpophalangeal joint, the wrist, etc.
Asking the patient to tell you when the tuning fork stops vibrating can be helpful if there is doubt that their vibration sense is intact.
Two-point discrimination
There are specific two-point discriminators available. If you don't have one, use a paper clip that you can open out.
Ask the patient to close their eyes.
Take the patient's index finger in one of your hands.
Using the discriminator or paper clip, touch the pulp of the finger with either one or two of the testing tips.
The patient must tell you whether they can feel one or two stimuli.
Find the minimum distance at which they can discriminate the two tips. Normal is at 3-5 mm.
Compare both index fingers and repeat for both thumbs.
Upper limb examination of the motor system2
Tone
This is the resistance felt when a joint is moved passively through its normal range of movement:
Ask the patient to let their shoulders and arms 'go floppy'.
Flex and extend their shoulder passively and feel for abnormality of tone.
Repeat for the elbow and wrist.
Hypertonia is found in upper motor neurone lesions; hypotonia is found in lower motor neurone lesions and cerebellar disorders.
Cogwheel rigidity may be found in Parkinson's disease.
Power3
A robust assessment of power is required.
The Medical Research Council (MRC) has a recommended grading system for power (see table). It has been shown to have good reliability although doubts have been expressed over the wide range of grade 4.
The manual muscle testing is scored differently with 4 - Good: full ROM against gravity with moderate resistance, and 5 - Normal: full ROM against gravity with maximum resistance.
Ask the patient to contract the muscle group being tested and then you as the examiner try to overpower that group.
Test the following:
Abduction, adduction, flexion and extension of the shoulder.
Flexion and extension of the elbow.
Flexion and extension of the wrist.
Supination and pronation of the forearm.
Extension of the fingers at the metacarpophalangeal and interphalangeal joints.
Flexion, extension, adduction and abduction of the fingers and thumbs.
MRC scale for muscle power
0 | No muscle contraction is visible. |
1 | Muscle contraction is visible but there is no movement of the joint. |
2 | Active joint movement is possible with gravity eliminated. |
3 | Movement can overcome gravity but not resistance from the examiner. |
4 | The muscle group can overcome gravity and move against some resistance from the examiner. |
5 | Full and normal power against resistance. |
Deep tendon reflexes
Ensure that the patient is comfortable and relaxed and that you can see the muscle being tested.
Use a tendon hammer to strike the tendon of the muscle and look for muscle contraction.
Compare both sides.
Reflexes can be hyperactive (+++), normal (++), sluggish (+) or absent (-). ± is used when the reflex is only present on reinforcement (see below).
In the upper limbs:
Test the biceps jerk (C5, C6): with their arm relaxed, hold the patient's elbow between your thumb and remaining fingers, your thumb being anterior and directly over the biceps tendon. Ideally the elbow should be held at 90°. Elicit the reflex by tapping on your thumb.
Test the triceps jerk (C6, C7): with their arm relaxed, hold the patient's arm across their lower chest/upper abdomen with one of your hands. Elicit the reflex by tapping over the triceps tendon just above and behind their elbow.
Test the supinator jerk (C5, C6): ask the patient to relax their arm across their abdomen. Elicit the reflex by tapping over the supinator tendon just above the wrist.
Test the finger jerk: with their hand relaxed, place the tips of your index and middle fingers across the palmar surface of the patient's proximal phalanges. Tap your fingers lightly with the tendon hammer. There should be slight flexion of the patient's fingers. If there is hyperreflexia, this flexion is exaggerated.
Test the Hoffmann's reflex: rest the distal interphalangeal joint of the patient's middle finger on the side of your right index finger. Use the tip of your right thumb to flick down on the patient's middle fingertip. Watch for any movement of the patient's thumb as their fingertip springs back up. Normally there is no movement; in hyperreflexia, thumb flexion can be seen.
If a reflex is difficult to elicit, try 'reinforcement' (the Jendrassik manoeuvre). Ask the patient to clench their teeth or squeeze their knees together while you try to elicit the reflexes again.
Interpretation
Upper motor neurone lesions usually produce hyperreflexia.
Lower motor neurone lesions usually produce a diminished or absent response.
Isolated loss of a reflex can point to a radiculopathy affecting that segment - eg, loss of biceps jerk if there is a C5-C6 disc prolapse.
Examination of co-ordination
The cerebellum helps in the co-ordination of voluntary, automatic and reflex movement. Tests of cerebellar function, however, are only valid if power and tone are normal, and that failure to perform them may also be related to power and tone abnormalities in the upper limb rather than a cerebellar problem. These include:
The finger-nose test:
The patient should keep their eyes open.
Hold one of your fingertips up in front of, and a short distance (about 30-40 cm) from, the patient.
Ask the patient to touch the tip of their nose and then to touch your fingertip alternately and repeatedly. You can continuously change your fingertip position to make the test more difficult.
You can then test for sensory ataxia by asking the patient to close their eyes and to touch the tip of their nose using their outstretched finger.
Repeat these tests on the other side.
Look for intention tremor and past-pointing as the patient touches the examiner's fingertip, which can indicate disease of the cerebellar hemispheres.
Rapid alternating movement:
The patient needs to have one palm facing upwards.
They need to touch this palm with the palmar and then dorsal sides of the fingertips of the other hand as quickly as possible. Note that they must lift the second hand between each movement and touch the same point on the other palm without rolling the hand.
Test both sides. It is normal for the dominant hand to be a little faster at this test.
Look for dysdiadochokinesis. This is inco-ordination or slow movement when trying to perform this test.
Neurological Examination
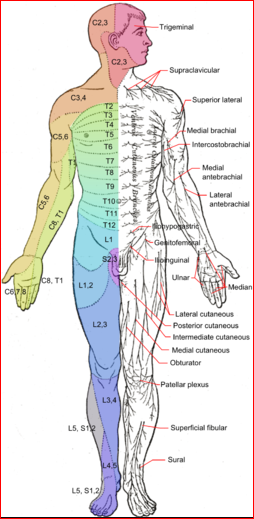
© Häggström, Mikael (2014). "Medical gallery of Mikael Häggström 2014". WikiJournal of Medicine 1 (2). DOI:10.15347/wjm/2014.008. ISSN 2002-4436. Public Domain
A note about sensation in the hand
The hand may require more intensive testing. It may be useful to return to it after testing the rest of the arm.
Test sensation on both the palmar and the dorsal aspects.
Be aware of the distribution of the median, ulnar and radial nerves:
The radial nerve supplies sensation to the skin on most of the dorsum of the hand.
The ulnar nerve supplies sensation to the palmar aspect of the little finger and the palmar aspect of the medial half of the ring finger. It also supplies the distal half of the dorsal aspect of these fingers.
The median nerve supplies sensation to the palmar aspect of the thumb, index and middle fingers and the lateral half of the ring finger. It also supplies the distal half of the dorsal aspect of these fingers.
Interpreting the findings
The site of any lesion can be determined by looking at the pattern of any dysfunction found. The dermatomal (segmental) and peripheral nerve innervation is labelled in the diagram above.
All of the sensory modalities can be affected in peripheral neuropathies and nerve injuries, cervical radiculopathy and spinal injuries.
If an individual nerve or sensory root is affected, all sensory modalities can be reduced.
If there is a spinal cord lesion, there may not be equal diminution across all of the sensory modalities: light touch, vibration and joint position sense may remain intact while sharp touch and temperature are lost. This is because the lateral spinothalamic pathways may be damaged while the dorsal columns remain intact. Cervical syringomyelia is an example where this may happen.
Problems with joint position sense or vibration usually occur distally first.
Vibration sense can be lost before joint position sense in peripheral neuropathy or myelopathy affecting the dorsal columns.
Parietal lobe lesions can also cause impairment of two-point discrimination.
The distal parts of the limbs tend to be affected in polyneuropathy, the legs usually being involved before the arms. A 'glove and stocking' effect is produced.
Exclusive updates for healthcare professionals
Stay informed with the latest clinical updates, professional insights, and evidence-based guidance. The Patient Pro newsletter curates essential content for healthcare professionals—delivered straight to your inbox.
By subscribing you accept our Privacy Policy. You can unsubscribe at any time. We never sell your data.
Further reading and references
- Neurological examination; Oxford medical examination (OME)
- Shahrokhi M, Asuncion RMD; Neurologic Exam
- Naqvi U, Sherman Al; Muscle Strength Grading
About the authorView full bio

Dr Toni Hazell, FRCGP
MBBS, BSc, FRCGP, DFSRH, Dip GU med, DRCOG, DCH (London, UK, 2000)
Dr. Toni Hazell qualified from St. Mary’s Hospital Medical School and did her VTS at Northwick Park Hospital.
About the reviewerView full bio

Dr Philippa Vincent, MRCGP
General Practitioner, Medical Author
MB BS, Bsc, MRCGP (2000), DCH, DFSRH, DRCOG
Dr Philippa Vincent is an NHS GP working in North London.
Article history
The information on this page is written and peer reviewed by qualified clinicians.
Article also available in English, German, Spanish, French, Italian, Portuguese, Hindi, Hebrew, Arabic, and Swedish.
Next review due: 20 Nov 2030
20 May 2026 | Latest version

Ask, share, connect.
Browse discussions, ask questions, and share experiences across hundreds of health topics.

Feeling unwell?
Assess your symptoms online for free
More in history and examination
- Anaemia of chronic disease
- Antenatal examinations and diagnosis of pregnancy
- Cluster headaches
- Dehydration in children
- First seizure
- Hip pain in children
- Inguinal hernias
- Knees that swell
- Left iliac fossa pain
- Mononeuropathies
- Narrow complex tachycardias
- Neonatal examination
- Peak flow recording
- Prevention of falls in elderly people
- Prolonged diarrhoea or vomiting
- Salivary gland disorders
- Syncope
- Upper gastrointestinal bleeding
- Vision testing and screening in young children
- Visual field defects